
How to Prepare Your Backyard for Fire Pit Installation
Preparing your backyard for a safe, durable, and enjoyable fire pit installation with proper grading, drainage, and clearances.
Installing a fire pit can transform a backyard into a warm, welcoming gathering place, but a great result starts long before the first flame is lit. Proper preparation ensures your fire pit is safe, durable, code-compliant, and enjoyable for years to come. From choosing the right type of fire pit to grading the ground, managing drainage, and planning utilities, each step builds on the last. Approaching the project methodically will save time, prevent costly mistakes, and help you create an outdoor feature that truly fits your home and lifestyle.
Understanding Fire Pit Types and Preparation Needs
Fire pits generally fall into five main categories: wood-burning, natural gas, propane, portable, and built-in permanent models. Wood-burning pits are often made of steel, stone, or masonry and offer a traditional experience, but they require space for wood storage, ash cleanup, and careful management of sparks and smoke. Gas and propane pits provide convenience and cleaner operation, typically using metal burners set into stone, concrete, or steel enclosures. Portable fire pits are the most flexible, while built-in models become permanent hardscape features that anchor an outdoor living area.
Your choice directly affects how much backyard preparation is needed. Gas fire pits require planning for buried gas lines or safe propane tank placement. Wood-burning pits benefit from larger non-combustible zones and good airflow. Portable units still need stable, level surfaces and clearances, even if they don’t require excavation. Choosing your fire pit type early allows every later step—drainage, base design, utilities, and safety clearances—to be tailored correctly.
Determining Your Project Scope and Budget
Before touching the yard, define what kind of project you’re actually building. A simple portable fire pit on a gravel pad is very different from a built-in masonry pit surrounded by a patio, lighting, and seating walls. Deciding whether you want just a fire feature or a complete outdoor living area will determine how extensive the site preparation needs to be.
Budgeting should include more than the fire pit itself. Ground leveling, drainage improvements, gravel or concrete bases, utility trenching, permits, and inspections all add cost. It’s smart to create a line-item prep budget that includes materials, labor, fees, and a small contingency. If money gets tight, prioritize safety and structural preparation over decorative upgrades. A beautiful pit on a poor base or in an unsafe location will cause headaches later.
Assessing DIY Versus Professional Installation
Some parts of fire pit preparation are well within DIY territory, such as clearing vegetation, basic leveling, or spreading and compacting gravel. Other tasks, especially gas line installation, electrical work, and complex masonry, are usually best left to licensed professionals.
A hybrid approach often works well: homeowners prepare the site and hire pros for utilities or final installation. When deciding what to take on, be honest about your skills, tools, and available time. Also consider building codes, insurance implications, and manufacturer warranty requirements. Even if you plan to do much of the work yourself, a brief consultation with a contractor early on can clarify preparation standards and prevent expensive rework.
Safety and Code Requirements Overview
Fire pits are regulated in many areas, and those rules shape how your backyard must be prepared. Local codes may dictate setbacks from structures and property lines, approved fuel types, and minimum clearances from vegetation. Some regions impose seasonal fire bans or restrictions on wood burning. Homeowner associations may add aesthetic or placement rules.
Preparation must meet safety standards such as non-combustible base materials, overhead clearances, and proper ventilation for gas pits. Treat this stage as foundational: verify regulations, secure permits if needed, and design your layout to meet or exceed all recommended safety distances.
Choosing the Ideal Location in Your Backyard
A good fire pit location balances safety, comfort, and convenience. Most codes require pits to be set back a certain distance—often 10 to 25 feet—from homes, sheds, and fences. Beyond legal requirements, think about heat and smoke affecting siding, windows, and outdoor furniture.
Wind patterns matter. Place the pit where prevailing winds carry smoke away from your house and neighbors. Avoid narrow corridors that funnel gusts and scatter embers. Sun and shade also influence comfort, especially in hot climates. Aim for natural shade nearby, but not directly under low branches or structures.
Privacy, noise, and access all factor in as well. Choose a spot that feels relaxed and secluded without blocking emergency access or foot traffic. Clear, safe paths from the house to the fire pit make the area more usable and enjoyable.
Evaluating and Preparing the Ground
Start by assessing the soil. Clay-heavy or poorly draining soil needs deeper excavation and thicker gravel bases, while sandy soil requires careful compaction to prevent shifting. Clear grass, weeds, shrubs, and surface roots from a generous area around the future pit and seating zone.
Leveling is critical. The fire pit base must be flat, while the surrounding ground should gently slope away to shed water. Compact the sub-base thoroughly, using multiple passes with a tamper or plate compactor. Mark the pit and seating footprint clearly so excavation and base layers cover the entire usable area, not just the pit itself.
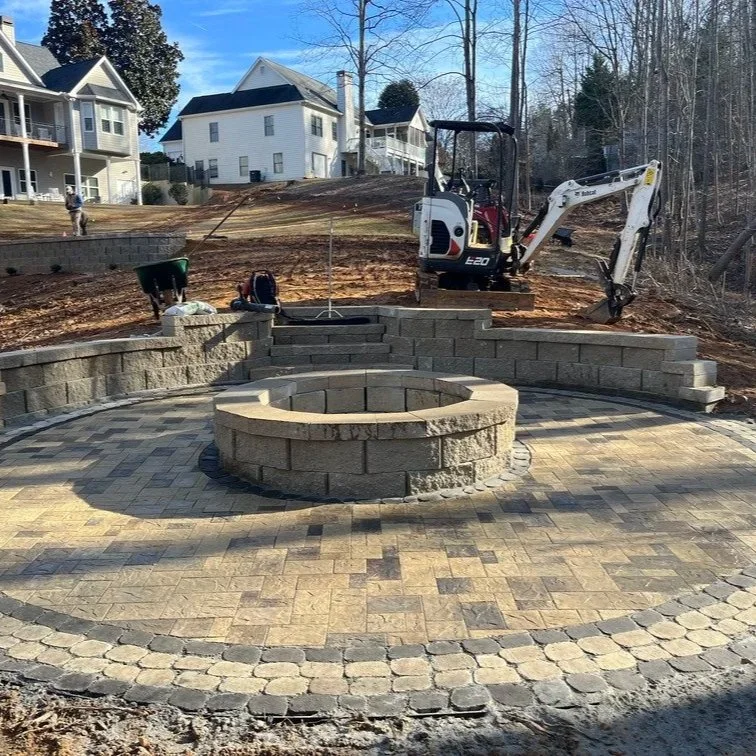
Designing a Safe Non-Combustible Base
A non-combustible base is one of the most important safety elements. Common options include compacted gravel, paver patios, poured concrete, or natural stone. Gravel drains well and is DIY-friendly, but can shift. Concrete is stable but requires precise installation. Pavers and stone strike a balance between durability and appearance.
Excavate to the correct depth based on your base layers. Install crushed stone or gravel in thin lifts, compacting each layer thoroughly. If using pavers or stone, add a thin bedding layer of sand or fine gravel. Extend the non-combustible surface several feet beyond the pit to catch embers and provide stable seating zones.
Planning for Drainage and Water Management
Observe how water behaves in your yard during rain. Avoid placing the pit in low spots where water pools. Grade the base and surrounding area to direct runoff away from the pit and nearby structures.
In wet or heavy-clay soils, consider permeable materials or even a French drain to redirect water. Built-in pits should include internal drainage so rainwater doesn’t collect in the burn chamber. Good drainage protects materials from rust, cracking, and frost heave, especially in cold climates.
Planning Gas, Propane, or Electrical Needs
Fuel choice shapes utility planning. Natural gas requires buried lines installed by licensed professionals. Propane needs safe, ventilated tank placement. Wood-burning pits require space for firewood storage and careful smoke management.
If adding lighting or electric ignition, plan conduit routes before final grading and base installation. Coordinate trenching for gas and electrical lines with other excavation work to avoid tearing up finished surfaces later. Document all utility locations for future reference.
Final Preparations and Ongoing Safety Planning
Before installation begins, review plans with contractors, confirm permits and inspections, and verify material deliveries. Protect existing landscaping and structures during work, and establish clear access routes for equipment.
Think beyond installation. Plan lighting for safe navigation, storage for fuel and tools, and access to fire extinguishers or hoses. Choose slip-resistant surfaces and maintain clearances from combustibles. A simple maintenance plan—covering ash removal, vegetation trimming, and periodic inspections—will keep the area safe and attractive long-term.
Conclusion
Preparing your backyard for fire pit installation is a multi-step process that goes far beyond picking a spot and setting a unit in place. It starts with understanding your fire pit options, defining the project scope, and researching codes and permits. Thoughtful site preparation—clearing, leveling, compacting, and building a non-combustible base—creates the structural and safety foundation on which everything else depends. Attention to drainage, utilities, and clearances ensures the fire pit area stands up to weather and daily use.
Just as important is how the fire pit integrates into your overall outdoor living space. Seating, hardscaping, landscaping, lighting, and safety features shape both the look and long-term usability of the area. By planning deliberately and preparing thoroughly, you create a code-compliant, durable, and inviting gathering place. With the groundwork done right, installation becomes smoother and more predictable, leaving you free to enjoy your fire pit with confidence and peace of mind.
FAQs
Most local codes and manufacturers recommend placing a fire pit at least 10 to 25 feet from buildings, fences, and sheds. The exact distance depends on pit size, fuel type, and local regulations, so always verify with your municipality and the fire pit manufacturer.
In many areas, permanent or gas-powered fire pits require permits and inspections, while small portable units may not. Check with your local building or fire department to confirm requirements before starting any preparation work.
Non-combustible materials such as compacted gravel, pavers, concrete, or natural stone are best. The right choice depends on your budget, climate, and design preferences, but the base must be stable, level, and well-drained.
Gas line installation is usually required to be performed by a licensed professional. While you may be able to handle site preparation or hardscaping, gas connections should be left to qualified installers for safety and code compliance.